
fischeye
Lesedauer:
[rt_reading_time postfix=“Minuten“ postfix_singular=“Minute“]
Seit Jahren fotografiere ich mit Kameras von Fujifilm und bin da natürlich immer mehr Fan der eingebauten Filmsimulationen geworden.
Allen voran Acros, Velvia und Classic Chrome. Was liegt da näher als sie beim Fotografieren auch zu benutzen.
Und weil die Bilder wirklich schön werden, kann man sich ja die RAW-Dateien und Entwicklung auch sparen und gleich JPEGs abspeichern.
Klingt irgendwie sehr verlockend, oder?
Das gilt nicht nur für Fujifilm. Auch wenn die Kameras anderer Hersteller natürlich keine Fuji-Filmsimulationen haben, können auch die JPEGs oft „out-of-cam“ genutzt werden.
Was spricht dafür und was dagegen? Das habe ich in diesem Artikel zusammengetragen.
RAW Dateien speichern die Signale, wie sie die roten, grünen und blauen Pixel des Sensors liefern.
Ohne RAW Entwickler wie Lightroom oder Capture One kann man sie gar nicht ansehen und ohne Bearbeitung auch nicht richt nutzen. Sie müssen bearbeitet werden, haben dafür das Maximum an Bildinformationen gespeichert. Je nach Kamera-Typ sind das 12, 14 oder 16 Bit je Pixel.
Meine Fuji X-T3 speichert beispielsweise Die Rohdaten in RAF Files mit 14 Bit Farbtiefe, also 16384 möglichen Farbwerten je Pixel. JPGs speichern mit 8 Bit Farbtiefe, das sind 256 Abstufungen je Farbwert.
Ein riesiger Unterschied, den man nicht sieht, weil unser Auge noch nicht einmal 256 Abstufungen erkennen kann. Aber bei der Bearbeitung wird das eine große Rolle spielen.
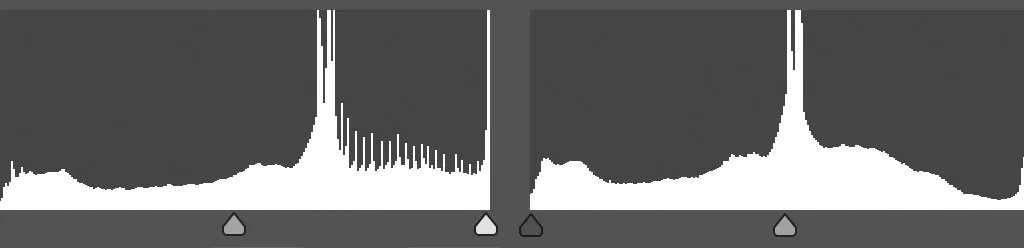
Hier zwei Histogramme eines JPG Bildes. Links ist das Histogram eines Bildes, bei dem ich eine Tonwertspreizung* vorgenommen habe.
Man sieht deutlich die Zacken, die darauf hindeuten, dass etliche Helligkeitswerte im Bild fehlen und die Farbübergänge kanten haben werden.
Rechts die bearbeitete RAW Datei. Hier sieht man eine wesentich weichere Kurve, die alle Helligkeitsabstufungen enthält.
*Tonwertspreizung: Ist eine Tonwertkorrektur, bei der der dunkelste Wert eines Bildes auf 0 (Schwarzpunkt), der hellste auf 255 (Weißpunkt) gesetzt wird und sämtliche weiteren Tonwerte des Bildes in dieser festgelegten Spanne aufgespreizt werden. Wenn der Kontrast erhöht wird, kann das z.B. passieren. Wenn das Bild nur sagen wir 200 von 255 Helligkeitswerte hat und wir die auf das gesamte Sprkrum von 0 bis 255 verteilen wollen, entstehen die Kanten an den Übergängen.
Rechnerisch sind die Qualitätsunterschiede zwischen RAW und JEPG also enorm.
Ein JPG Bild meiner X-T3 belegt ca. 7 MB Speicherplatz, eine komprimierte RAW Datei ca 30MB. Viermal so viele Informationen….
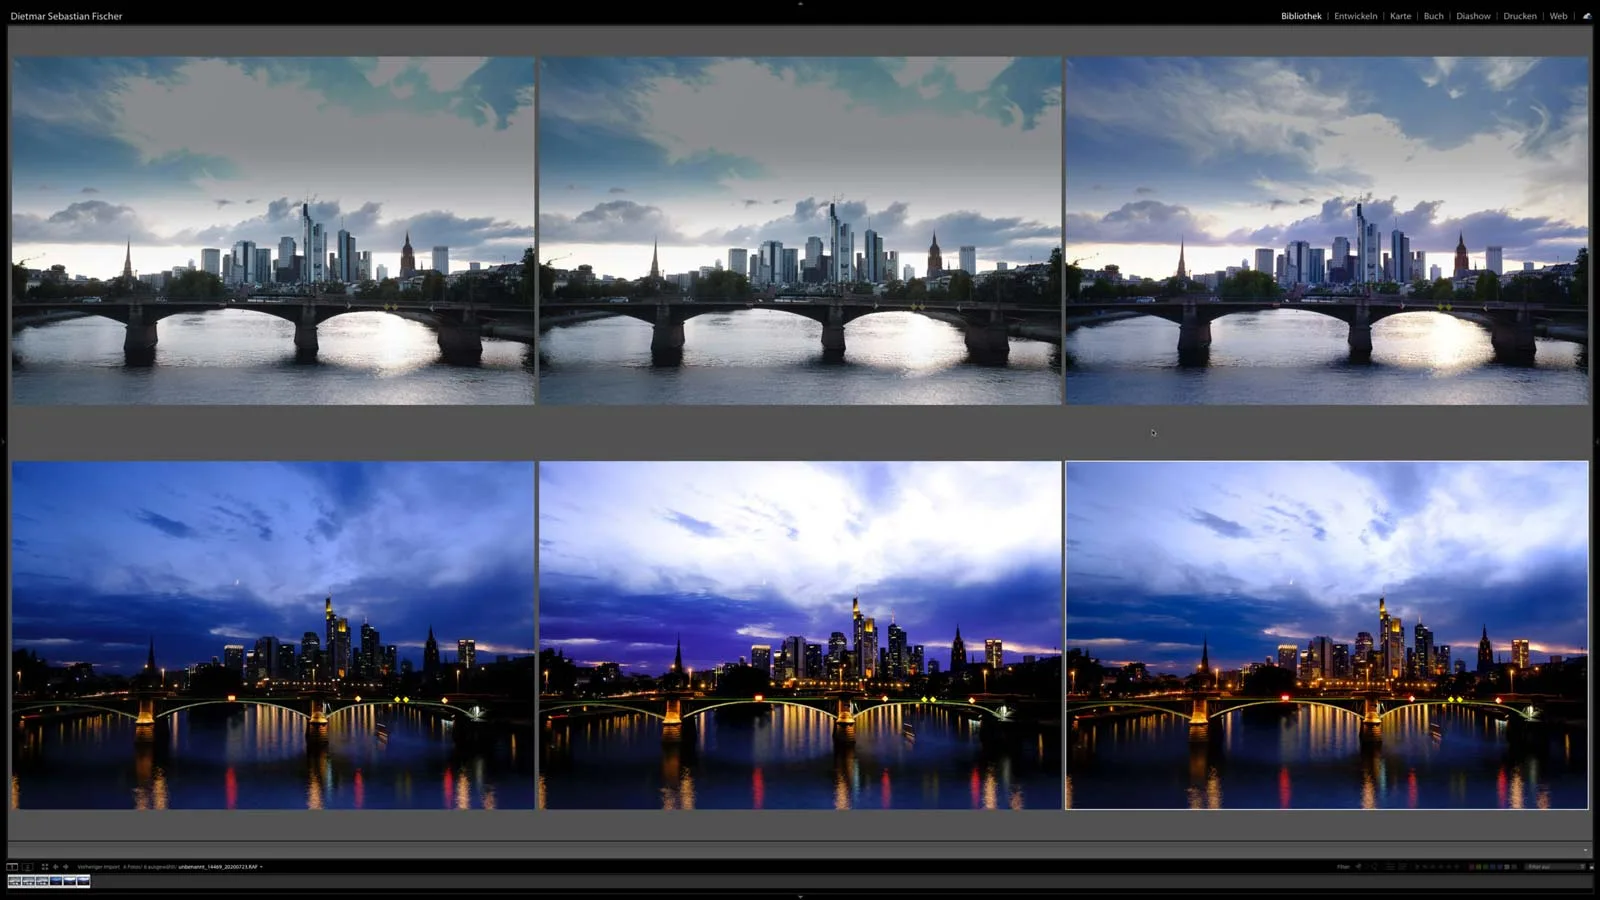
Aber wie sieht das in der Praxis aus? Ich habe dazu 2 Bilder für Euch verglichen.
In der Gegenüberstellung seht ihr für beide Bilder
– Links: Das unbearbeitete JPEG,
– Rechts: das bearbeitete RAW Bild
– In der Mitte: Die Anpassungen vom RAW Bild auf eine Kopie des JPEGs übertagen. (in Lightroom einfach eine Virtuelle Kopie vom JPEG gemacht und darauf die Einstellungen vom RAW übertragen)
Das JPEG Bild in der Mitte ist also genauso bearbeitet wie das RAW Bild.
Mein Fazit:
Dem Gedanke, einfach nur noch JPEGs abzuspeichern und die paar Anpassungen, die ein richtig belichtetes Bild benötigt dann darin zu machen, hatte ich auch schon oft.
Und er klingt ja auch charmant. Vor der Aufnahme so viel, wie möglich am Bild komponieren macht Sinn.
Aber selbst geringe Anpassungen im eigentlich richtig belichteten zweiten Bild waren in der JPEG Datei nicht mehr möglich.
Die JPEGs kannst du nutzen, wenn du dir sicher bist, dass du die Bilder im Nachhinein nicht mehr editieren willst, ansonsten schreibe RAWs!
RAW Dateien sind wie die Film-Negative aus der analogen Zeit, sie enthalten die DNA des aufgenommen Bildes. Im JPEG und im analogen Fotoabzug vom Negativ sieht man nur einen kleinen Ausschnitt daraus.
Die Negativ-Streifen und die RAWs, beides sollte man gut aufheben!
Wann kann man sich nun sicher sicher sein? Ich habe vor ca 10 Jahren auf einer Reise durch Neuseeland ein wirklich wunderschönes Bild gemacht, es aber nur in JPEG gespeichert.
Heute würde ich wie eigentlich immer in der Nachbearbeitung gerne noch ein paar Akzente setzten, das Bild lässt das aber nicht zu.
So sehr ich Velvia und Classic Chrome auch mag, ich weiss nicht, ob ich das in 10 Jahren noch mag, das gleiche gilt zum Beispiel für schwarz-weiss Bilder mit knackigen Kontrasten (und damit wenig Zeichnung in den Mitten).
Ja, es gibt tatsächlich Momente, da schreibt meine Kamera nur JPEGs.
Wenn ich sicher bin, die Bilder werden nicht alt.
Bilder für eine Instagram Story, die ich gleich poste.
Bilder, die so schnell zum Kunden müssen, dass gar keine Zeit für Nachbearbeitung ist, nehme ich als JPEGs auf. Wenn sie sie später noch einen Wert haben, dann auch als RAW auf eine Seite Karte.
Sofortbild-Kameras schreiben auch keine RAW Dateien.
Und den Look meiner analogen Farbbilder habe ich auch nur durch die Auswahl des Films beeinflussen können, weil den Rest ein Labor gemacht hat.
Ja, es kann durchaus ein Stilmittel sein, seine Bilder mit einem Filmlook als fertige Werke anzusehen, sie nicht mehr zu bearbeiten, sondern sie so wie sie sind zu benutzen.

Die Film Looks von Fujifilm kann man im Lightroom sogar auf Bilder von anderen Herstellern anwenden. Wie das geht, zeigt Jan Lorenz.
Meine Kameras speichern so gut wie immer nur RAW, manchmal RAW+JPG und manchmal nur JPG.
… eigentlich fast immer!
Bei RAW Bildern bist du gezwungen, jedes Bild von Hand nachzubearbeiten. Weißabgleich, Kontrast, Schärfe und Farben stehen per Default beim Import in deinen RAW-Konverter auf Werten, die „neutral“ gehalten sind. Das Bild wirkt langweilig, flach und hat zu wenig Kontrast und Schärfe. Du hast aber allen Gestaltungsspielraum, dein finales Bild so aussehen zu lassen, wie du magst und musst dich nicht auf die Filmlooks oder Kreativ-Filter, wie sie bei anderen Kamera-Marken genannt werden, beschränken.
Mein Ziel ist es mit einem Bild das zu zeigen, was ich bei der Aufnahme gefühlt habe, nicht das, was ich gesehen habe. Mit Filmlooks und Filtern alleine geht das in der Regel nicht.
Das ist eigentlich der wichtigste Punkt, wieso ich RAW-Dateien benutze. RAW Dateien muss ich – aber ich kann sie auch bearbeiten und das Bilde entstehen lassen, das ich bei der Aufnahme im Kopf hatte.
… ich Bilder brauche, die ich auf mein iPhone übertragen möchte, bevor ich wieder zu Hause meine Daten auf meinen Mac übertrage. Die meisten iOS-Apps (inclusive der von Fujifilm) können mit den Fuji RAF Dateien nichts anfangen. Wenn also schnell mal was zu Instagram & Co. hochgeladen werden soll oder ich die Bilder mit hjemandem teilen möchte, speichere ich die Bilder auch in JPG
… ich sehr, sehr viel Bilder mache. Nein, nicht bei Hochzeiten. Sondern bei Timer-gesteuerten Aufnahmen für Timelapse-Videos. Ansonsten nur aus versehen.
Wenn du eh nur RAW Dateien speicherst, kannst du den Film-Look auch auf s/w stellen. Dadurch siehst du auch vor der Aufnahme das Bild nur in s/w und kannst dich komplett auf Bildaufbau und Belichtung konzentrieren und wirst nicht durch die Farben im Bild abgelenkt.
Bei der Basis ISO meiner X-T3 von ISO 160 steht mir nur DR100 zur Verfügung, ab ISO320 dann DR200 und ab ISO 800 dann DR400. (Einzustellen im I.Q. Bereich des Menüs)
Bei Canon, Nikon, Sony gibt es das auch, dort heisst es dann DRO, ALO „Active D-Lighting“
Solltest du also tatsächlich nur JPEGs schreiben, könnte es Sinn machen statt ISO 160 und DR100 mit DR200 oder DR400 einer höheren ISO zu arbeiten. Dadurch werden die Bilder vor dem Speichern erst 1 oder 2 Stufen unterbelichtet und dann die dunkleren Bereiche wieder aufgehellt. Dadurch kommt es (hoffentlich) seltener zu komplett weissen Wolken wie bei mir im ersten Bild.
Willst du zu diesem Thema mehr wissen, empfehle ich dir die Seite von Rico Pfirstinger auf fuji-x-secrets.de